Unboxing and Initial Setup
Carefully unbox the Instant Solo Coffee Maker and all accessories. Remove packaging materials, place the machine on a dry, stable surface, and prepare for first use.
1.1. Removing the Coffee Maker and Accessories from the Box
Carefully pull the Instant Solo Coffee Maker and all included accessories out of the box. Gently remove any protective packaging materials, such as foam inserts or plastic wrap, from both the machine and its components. Ensure all items, including the water tank, reusable coffee pod, and drip tray, are free from packaging debris. This step ensures the coffee maker is ready for initial setup and prevents any damage caused by leftover materials.
1.2. Placing the Coffee Maker on a Dry, Stable, and Level Surface
Position the Instant Solo Coffee Maker on a flat, even surface, ensuring it is both dry and stable. A level surface is crucial for proper water distribution and brewing performance. Avoid placing the machine near edges or unstable areas to prevent accidental tipping. Additionally, choose a location away from direct sunlight or moisture sources to maintain optimal operating conditions. This setup ensures safety and consistent performance for your brewing experience.
1.3. Removing Packaging Materials and Preparing the Device
After unboxing, carefully remove all packaging materials from the Instant Solo Coffee Maker. Lift the water tank and discard the foam cushion underneath. Reattach the tank to the base. Ensure no packaging remains inside the machine. Wipe down the exterior and interior with a soft cloth to remove any dust or debris. This step ensures the device is clean and ready for its first use. Proper preparation helps maintain performance and prevents any residual materials from affecting your first brew.
Understanding the Instant Solo Coffee Maker
The Instant Solo Coffee Maker is a versatile appliance designed for single-serve brewing. It supports both K-Cup pods and ground coffee using the included reusable pod. With adjustable cup sizes (8-12 oz.), customizable brew strength, and a Bold setting, it offers tailored brewing experiences. The machine features a 40oz water reservoir, removable drip tray, and compact design, making it ideal for home or office use. Its intuitive interface and compatibility with various coffee options ensure a convenient and personalized brewing process for coffee lovers of all preferences.
2.1. Key Features and Benefits of the Instant Solo Coffee Maker
The Instant Solo Coffee Maker offers remarkable versatility and convenience. Its compatibility with both K-Cup pods and ground coffee allows users to brew their preferred coffee with ease. The adjustable cup platform accommodates cups from 8 to 12 ounces, ensuring a perfect fit for any mug. The Bold setting enhances flavor for a stronger brew, while the reusable pod reduces waste and saves money. A large 40oz water reservoir minimizes refills, and the removable drip tray simplifies cleaning. Its compact design and sleek interface make it an ideal choice for home or office, delivering café-quality coffee quickly and effortlessly, tailored to individual preferences.
2.2. Compatible Coffee Options: K-Cup Pods and Ground Coffee
The Instant Solo Coffee Maker supports two convenient coffee options: K-Cup pods and ground coffee. For K-Cup users, it offers a mess-free experience with a wide variety of flavors. Alternatively, the included reusable pod allows you to scoop your preferred ground coffee, ensuring freshness and customization. Simply add 2 tablespoons of medium to medium-fine ground coffee to the reusable pod for an optimal brew. This dual compatibility caters to diverse preferences, making it easy to enjoy your favorite coffee in the comfort of your home, whether you prefer pods or freshly ground beans for a personalized taste.
2.3. Adjustable Cup Platform and Customizable Brew Sizes
The Instant Solo Coffee Maker features an adjustable cup platform, accommodating cups from 8 to 12 ounces, ensuring a perfect fit for your favorite mug or travel cup. The machine allows you to customize brew sizes to suit your preference, offering flexibility for different coffee needs. Additionally, the Bold setting enhances brew strength for a richer flavor. This versatility makes it easy to tailor your coffee experience, whether you prefer a strong, bold cup or a standard brew, all while maintaining optimal flavor and convenience. The adjustable platform also prevents spills, ensuring a clean and hassle-free brewing process.

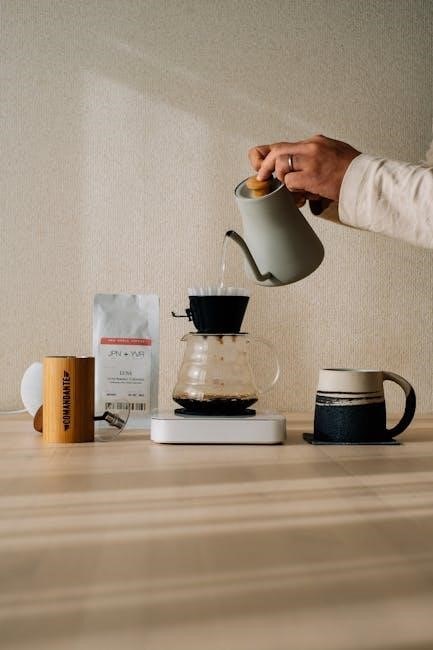
Brewing Your First Cup of Coffee
Insert a K-Cup pod or add ground coffee to the reusable pod. Fill the water reservoir, select your cup size, and brew. Enjoy a quick, high-quality cup.
3.1. Using K-Cup Pods for a Quick and Convenient Brew
Insert a K-Cup pod into the pod holder, ensuring it clicks securely. Select your preferred brew size and strength. The machine will puncture the pod and brew a perfect cup. This method offers a mess-free experience, allowing you to enjoy a wide variety of flavors. The process is fast, delivering hot coffee in about 90 seconds. For added customization, use the Bold setting for a stronger brew. Always ensure the water reservoir is filled before brewing for optimal performance.
3.2. Brewing with Ground Coffee Using the Reusable Pod
For a customizable brew, use the reusable pod included with your Instant Solo Coffee Maker. Place the pod in the machine, add 2 tablespoons of medium to medium-fine ground coffee, and secure the lid. Select your desired brew size and strength. The machine will brew a fresh cup using your grounds. This method allows for a more personalized flavor experience. Ensure the coffee grounds are evenly distributed for optimal extraction. Cleaning the reusable pod after each use is recommended to prevent residue buildup and maintain flavor quality.
3.3. Scooping the Right Amount of Coffee for Optimal Flavor
For optimal flavor, use 2 tablespoons of medium to medium-fine ground coffee in the reusable pod. Ensure the grounds are evenly distributed to allow proper water flow. Using the right amount prevents under or over-extraction, balancing the brew’s strength and flavor. Adjust the quantity based on your preference for a stronger or lighter cup. Freshly ground coffee is recommended for the best taste. This step ensures a perfect brew every time, tailored to your liking.

Customizing Your Brewing Experience
Adjust brew strength, select cup sizes (8-12 oz.), and use the Bold setting for a stronger brew. Customize settings to suit your coffee preferences perfectly.
4.1. Adjusting Brew Strength for Personal Preference
The Instant Solo Coffee Maker allows you to customize brew strength to suit your taste preferences. Choose between regular or bold settings for a stronger, richer flavor. The bold setting slows down the brewing process, extracting more from your coffee grounds or K-Cup pod. This feature ensures your coffee is tailored to your liking, whether you prefer a mild morning pick-me-up or a robust afternoon brew. Adjusting the brew strength is simple using the machine’s intuitive controls, making it easy to experiment and find your perfect cup every time. The machine’s flexibility ensures a personalized brewing experience for all coffee lovers.
4.2. Selecting the Perfect Cup Size (8 to 12 oz.)
Easily customize your coffee portion with the Instant Solo Coffee Maker by selecting cup sizes ranging from 8 to 12 ounces. The adjustable cup platform accommodates different cup sizes, ensuring minimal spills and a clean brewing process. Whether you prefer a small, concentrated shot or a larger, more relaxed cup, the machine adapts to your needs. This feature is perfect for households with varying coffee preferences, allowing each user to enjoy their ideal cup size without compromising on flavor or convenience. The intuitive controls make it simple to choose the right size for every brew.
4.3. Using the Bold Setting for a Stronger Brew
The Instant Solo Coffee Maker features a Bold Setting that enhances extraction time, delivering a richer, more intense flavor. Perfect for coffee lovers who prefer a bolder cup, this setting ensures a deeper brew without compromising on quality. Simply select the Bold option on the machine or through the app for a stronger coffee experience tailored to your taste preferences. This customizable feature allows you to enjoy a more robust cup while maintaining the convenience and ease of use that the Instant Solo is known for.

Maintenance and Cleaning
Regularly clean the Instant Solo Coffee Maker by emptying the drip tray, descaling to remove mineral deposits, and wiping surfaces with a damp cloth to ensure optimal performance.
5.1. Daily Cleaning Tips to Ensure Optimal Performance
To maintain your Instant Solo Coffee Maker, clean it daily after use. Empty the drip tray and wash it with warm, soapy water. Rinse the reusable coffee pod thoroughly and wipe down the machine’s exterior with a damp cloth. Regular cleaning prevents buildup and ensures consistent flavor. For deeper maintenance, descale every 1-3 months to remove mineral deposits that can affect performance. Always unplug the machine before cleaning and avoid using abrasive materials that could damage surfaces.
5.2. Descaling the Coffee Maker to Remove Mineral Deposits
Descaling your Instant Solo Coffee Maker is essential to remove mineral deposits that can affect performance. Use a descaling solution or white vinegar by running it through a brew cycle. After descaling, rinse thoroughly with fresh water to eliminate any lingering taste. This process should be done every 1-3 months, depending on usage and water hardness. Regular descaling ensures optimal temperature, brew strength, and prevents machine malfunction. Always refer to the manual for specific descaling instructions tailored to your device.
5.3. Cleaning the Drip Tray and Water Reservoir
Regularly clean the drip tray and water reservoir to maintain your Instant Solo Coffee Maker’s performance. Remove the drip tray and wash it with warm, soapy water. Rinse thoroughly and dry to prevent water spots. For the water reservoir, empty it completely, rinse with fresh water, and occasionally clean with a mixture of water and white vinegar. Ensure all parts are dry before reassembling. Cleaning these components regularly helps prevent mineral buildup and ensures fresh-tasting coffee every time. Refer to the manual for detailed cleaning instructions.

Safety Information
Read all safety precautions in the manual to avoid injury or damage. Follow guidelines for proper use, electrical safety, and maintenance to ensure safe operation of your Instant Solo Coffee Maker.
6.1. General Safety Precautions for Using the Coffee Maker
To ensure safe operation, always follow these guidelines: Keep the Instant Solo Coffee Maker out of reach of children. Avoid placing it near flammable materials or water sources. Never submerge the device in water or expose it to excessive moisture. Use only approved accessories and avoid modifications. Clean the machine regularly to prevent mineral buildup. Always unplug the device before cleaning or maintenance. Follow the instructions carefully to avoid overheating or electrical hazards. Consult the manual for detailed safety precautions to ensure optimal performance and user safety.
6.2. Electrical Safety Guidelines
For safe operation, use the Instant Solo Coffee Maker with a properly installed electrical outlet rated for 120V AC. Avoid using damaged cords or loose connections. Keep the device away from water sources to prevent electrical shock. Ensure the coffee maker is placed on a dry, stable surface. Do not operate near flammable materials or in areas with poor ventilation. Unplug the machine when not in use or during cleaning. Never attempt repairs yourself; contact authorized personnel for servicing. Adhere to these guidelines to ensure safe and reliable performance.
6.3. Avoiding Common Hazards During Operation
Always ensure the Instant Solo Coffee Maker is placed on a stable, heat-resistant surface. Keep children away from the machine while it’s operating, as hot surfaces and liquids can cause burns. Avoid overfilling the water reservoir to prevent spills. Do not leave the coffee maker unattended during brewing. Be cautious when handling the brew basket or reusable pod, as they may be hot. Regularly clean and descale the machine to prevent mineral buildup and maintain performance. Follow these precautions to ensure safe and enjoyable coffee brewing every time.

Troubleshooting Common Issues
Check power connections, water levels, and descale regularly. Ensure proper pod alignment and clean the brew basket. Consult the user manual or contact support for unresolved issues.
7.1. Resolving Issues with Coffee Temperature
For temperature issues, ensure the water reservoir is filled with fresh water and descale regularly to remove mineral buildup. Check the machine’s temperature settings and adjust if necessary. If the coffee is too hot or cold, refer to the user manual for troubleshooting steps or contact customer support for assistance. Proper maintenance and cleaning can help maintain optimal brewing temperatures for your Instant Solo Coffee Maker.
7.2. Fixing Problems with Brew Strength and Flavor
If your coffee’s strength or flavor is inconsistent, adjust the brew strength setting or use the Bold option for a stronger brew. Ensure you’re using the correct grind size and fresh coffee. Clean the machine regularly to prevent residue buildup. Check the reusable pod for proper alignment and rinse it thoroughly. If issues persist, descale the machine and ensure the water reservoir is filled with fresh, filtered water. These steps will help restore optimal flavor and strength to your Instant Solo Coffee Maker.
7.3. Addressing Machine Malfunctions and Error Codes
If the Instant Solo Coffee Maker displays error codes or malfunctions, unplug it, wait 30 seconds, and restart. Check for blockages in the water reservoir or coffee pod. Ensure the machine is properly assembled and all parts are clean. Refer to the user manual for specific error code meanings. If issues persist, contact Instant Pot customer support for assistance or repair options. Regular maintenance and cleaning can help prevent malfunctions and ensure optimal performance.
Warranty and Customer Support
Your Instant Solo Coffee Maker is backed by a comprehensive warranty. Visit the official website or contact customer support for assistance with repairs, replacements, or inquiries.
8.1. Understanding the Warranty Coverage for the Instant Solo
The Instant Solo Coffee Maker is covered by a one-year limited warranty from the date of purchase. This warranty includes protection against manufacturing defects in materials and workmanship, ensuring your device functions as intended. For details, refer to the manual or visit the official website. Warranty coverage is non-transferable and requires proof of purchase. Registering your product enhances warranty benefits and provides extended support options. Contact customer support for any warranty-related inquiries or claims. Proper use and maintenance are essential to uphold warranty validity. This coverage gives you peace of mind while enjoying your coffee maker.
8.2. Contacting Customer Support for Assistance
For assistance with your Instant Solo Coffee Maker, contact customer support through the official website or phone. Visit the support page for troubleshooting guides, FAQs, and direct contact options. Ensure you have your product serial number and proof of purchase ready for warranty or repair requests. Registered users can access priority support and exclusive resources. Refer to pages 18-19 of the manual for detailed warranty information and support contact details. Reaching out to customer support ensures prompt resolution for any issues or concerns you may have.
8.3. Registering Your Product for Extended Benefits
Register your Instant Solo Coffee Maker on the official website to unlock extended benefits. Create an account, provide your product details, and upload your purchase receipt. Registration grants access to exclusive content, personalized support, and potential warranty extensions. It also ensures you receive firmware updates, new recipes, and priority customer service. Visit the Instant Pot website or use the Instant Connect App to complete the registration process. This step enhances your ownership experience and keeps your device up-to-date with the latest features and improvements.

Advanced Features
The Instant Solo Coffee Maker offers advanced features like the Instant Connect App for personalized brewing, customizable settings, and firmware updates to enhance your coffee experience.
9.1. Using the Instant Connect App for Personalized Brewing
The Instant Connect App allows you to customize your brewing experience remotely. Schedule brews, adjust strength, and explore recipes. Compatible with iOS and Android, it offers enhanced control over your coffee preferences. Use it to set timers, monitor brewing progress, and save custom settings. The app also provides maintenance alerts and firmware updates. Pair your Instant Solo Coffee Maker with the app for a seamless, personalized coffee experience. Download the app, connect your device, and start brewing your perfect cup from anywhere.
9.2. Exploring Coffee Recipes and Custom Settings
Discover a variety of coffee recipes and tailor your brewing experience with custom settings. Experiment with different strengths, cup sizes, and flavors to suit your taste. The Instant Solo Coffee Maker allows you to adjust brew strength and size, ensuring a personalized experience. Explore recipes for espresso-style shots, lattes, and more. Save your preferences for quick access. This feature enables you to create cafe-quality coffee at home, experimenting with flavors and settings to find your perfect brew every time.
9.3. Updating the Coffee Maker’s Firmware
To ensure optimal performance, regularly update your Instant Solo Coffee Maker’s firmware. Connect the machine to the Instant Connect App and navigate to the settings menu. Check for available updates and follow the on-screen instructions to download and install the latest version. Keep the device connected throughout the process to avoid interruptions. Firmware updates enhance functionality, improve compatibility, and add new features. Always update to the latest version for the best brewing experience and to access advanced settings. Regular updates ensure your coffee maker stays up-to-date with the latest innovations.
Your Instant Solo Coffee Maker is designed to deliver a perfect cup every time. With its customizable settings and app connectivity, it offers a seamless brewing experience. Explore various coffee varieties and experiment with different strengths and sizes to find your ideal brew. Regular updates and maintenance will keep your machine performing optimally. Enjoy the convenience of café-quality coffee in the comfort of your home with the Instant Solo.
10.1. Final Tips for Getting the Most Out of Your Instant Solo
To optimize your Instant Solo Coffee Maker, always clean and descale regularly to maintain performance. Experiment with different coffee strengths and cup sizes to suit your taste preferences. For the best flavor, use fresh, high-quality coffee beans or pods. Utilize the reusable pod for ground coffee to reduce waste and explore new flavors. Keep the water reservoir filled and ensure the machine is on a level surface for even brewing. Lastly, download updates for the Instant Connect App to access new features and recipes, ensuring you enjoy the perfect brew every time.
10.2. Encouraging Exploration of Coffee Varieties and Settings
Take full advantage of your Instant Solo Coffee Maker by exploring diverse coffee varieties and settings. Experiment with different K-Cup pods or freshly ground beans to discover your favorite flavors. Adjust the brew strength and cup size to customize your experience. Try the Bold setting for a richer taste or use the reusable pod for precision. Explore coffee from various origins and roasts to enhance your palate. Use the Instant Connect App to unlock personalized recipes and settings, ensuring every cup is tailored to your preference. This encourage a deeper appreciation for coffee and maximizes your machine’s potential.